The ShāngMì 4 (SM4) Block Cipher: A Deeper Look into China’s Encryption Standard

Image of SM4 as an artistic representation

In my journey through the world of cryptography, I’ve previously explored and shared insights on the Advanced Encryption Standard (AES) and the Data Encryption Standard (DES) — ciphers that hold a prominent place in Western cryptographic practices. Venturing further, I delved into the realm of Soviet/Russian cryptography with a detailed examination of the GOST Magma cipher in a YouTube video. Continuing on this path, I’ve now expanded my exploration to include the Chinese block cipher ShāngMì 4 (SM4 ,商密4). In the latest video on my YouTube channel (which you’ll find at the conclusion of this blog post), I explain the structure and mechanics of SM4, showcasing its unbalanced Feistel network design and its building blocks.

A glimpse into SM4’s history

Originally named SMS4, the SM4 Block Cipher is not just an algorithm; it’s a testament to China’s stride towards self-reliance in information security. Drafted by the Data Assurance & Communication Security Center alongside the Commercial Cryptography Testing Center under the National Cryptography Administration, SM4 was officially released on March 21st, 2012. It transitioned from an internal specification to a national standard in China in August 2016. It is mainly developed by Lü Shuwang (Chinese: 吕述望).

SM4 overview

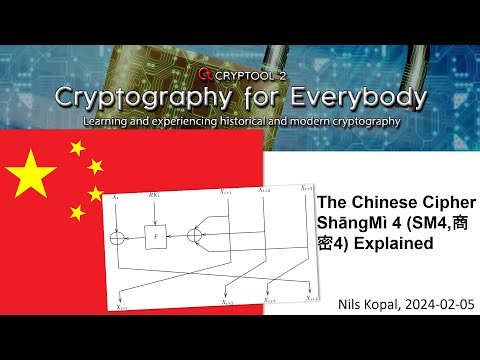
At its core, SM4 is a symmetric block cipher, characterized by a 128-bit block and key size, operating over 32 rounds. It employs an unbalanced Feistel network structure, utilizing an S-box for its non-linear transformation. Each round of the cipher involves linear and non-linear operations, including XORs, shifts, and table lookups within a so-called F function. Each round, a different of the 32 round keys is used.

SM4 single round (image from Wikipedia)

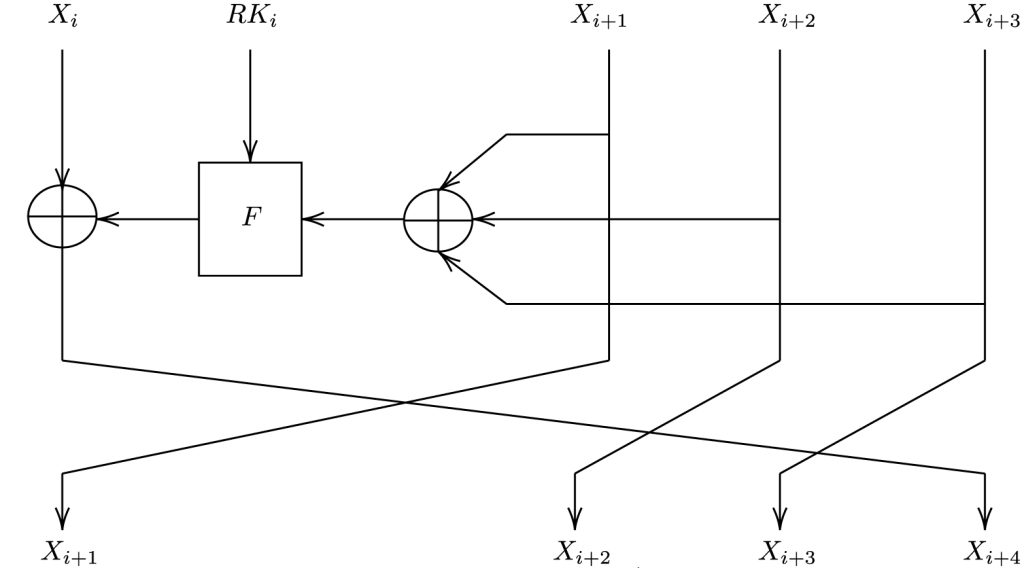
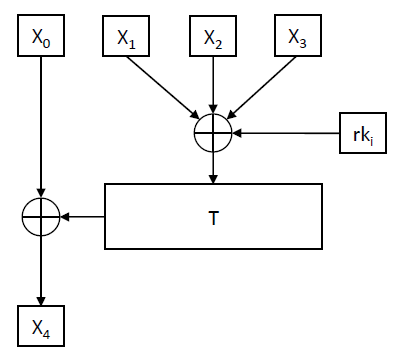
SM4 divides its 128-bit input into four 4-byte blocks (X0, X1, X2, and X3). The first block is XOR-ed with the result of the F function and becomes the new 4th block. The old second, third, and fourth blog become the new first, second, and third block.

The round function is the heart of SM4: the F function

The round function of SM4, denoted as F, is where the “magic happens”. It takes in four inputs along with a round key and undergoes a series of transformations, including XOR operations and the application of the T function. The T function itself is a blend of non-linear (Tau) and linear (L) transformations, ensuring that the output is highly unpredictable, thereby enhancing security.

SM4 F function

The f Function calls the T function, which calls the L function, which calls the Tau function (S-Box lookups):

Equations of the F function (including T function, L function, and Tau function)

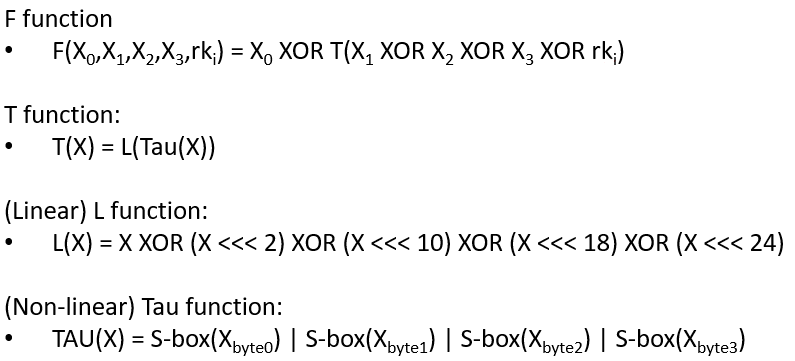
Below, we explain the non-linear function Tau as well as the linear function L.

The non-linear part: the Tau function

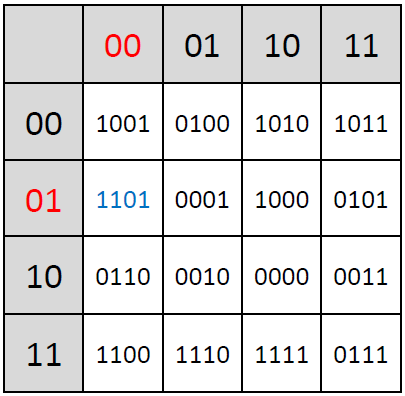
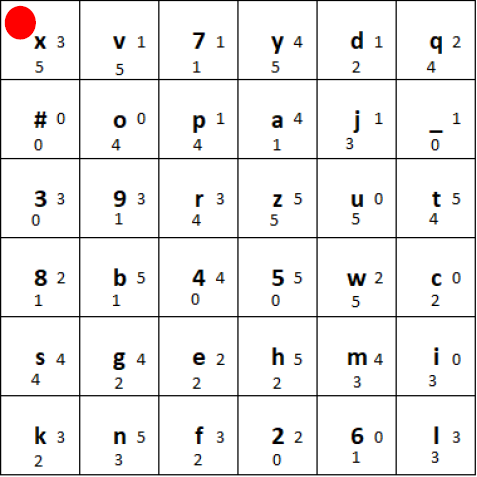
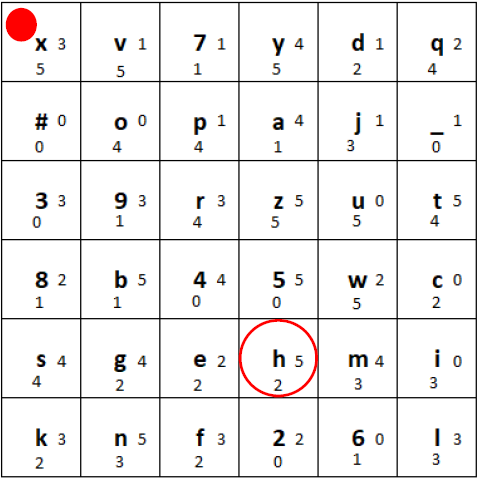
The non-linear function Tau, a fundamental component of the SM4 block cipher, plays a crucial role in the cipher’s security by introducing complexity and thwarting linear and differential cryptanalysis attacks. This function operates on the principle of substitution, where each byte of input is replaced with a corresponding byte from a pre-defined 8-bit S-box:

SM4 S-box (lookup table with 256 entries)

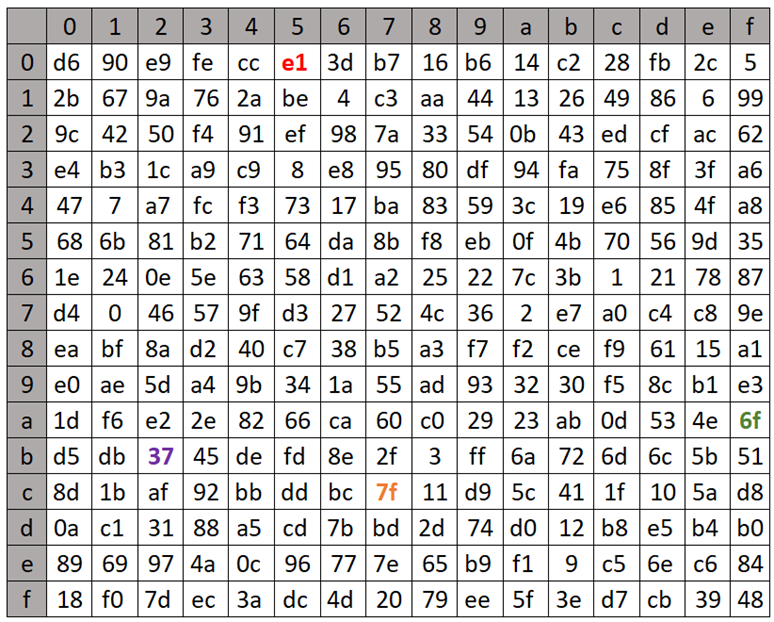
The Tau function processes input data in four bytes, applying the S-box transformation to each byte independently. The S-box, which stands for substitution box, is designed to be non-linear; it maps each 8-bit input to a new 8-bit output in a way that is deliberately non-linear and hard to predict. This unpredictability is what gives the Tau function its strength against cryptographic attacks, making the cipher more secure.

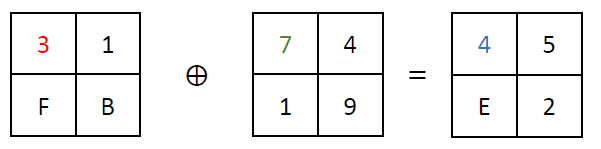
For example, given a 4-byte input, the Tau function applies the S-box transformation to each of these bytes. Example (values retrieved from the lookup table are highlighted in the same colors as used in the table depicted above; shown values are in hexadecimal format):

SM4 Tau function example computation

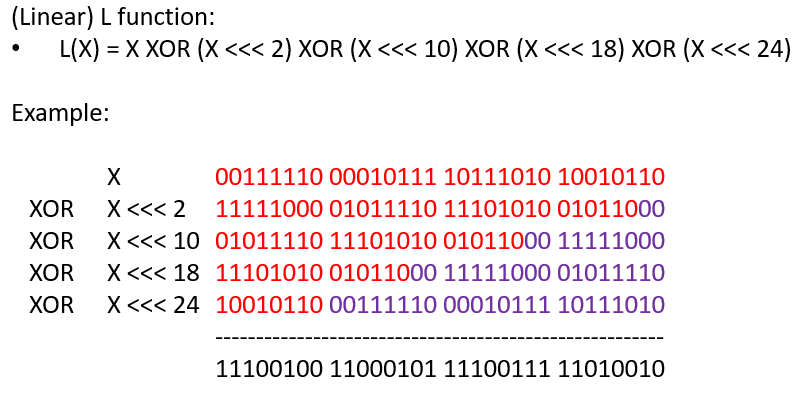
The linear part: the L function

The L function is a the second component of the F function, serving as the linear transformation stage that follows the non-linear Tau function in the encryption algorithm. Its primary role is to disperse the output of the Tau function across the block, enhancing the diffusion of the cipher. This process is essential for ensuring that changes in a single bit of the plaintext or the key propagate widely throughout the ciphertext, a property that strengthens the cipher against various forms of cryptanalysis.

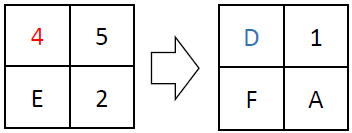
The L function operates by performing exclusive OR (XOR) operations on the input with shifted versions of itself. Specifically, it takes a 32-bit input and applies XOR with the input shifted left by 2, 10, 18, and 24 bits. This series of shifts and XORs ensures that the influence of each bit spreads across the entire block, contributing to the diffusion of the cipher. Its defined in the following equation; below is an example computation of the L function:

L function and example computation

Decryption

In the Feistel cipher design, the decryption process closely mirrors encryption, with a crucial difference: the round keys are applied in the opposite sequence. This means that during decryption, the keys are used in reverse order from how they were applied in encryption. This reversal is a key feature of the used Feistel structure, enabling the algorithm to easily reverse the encryption steps and recover the original plaintext.

The key expansion

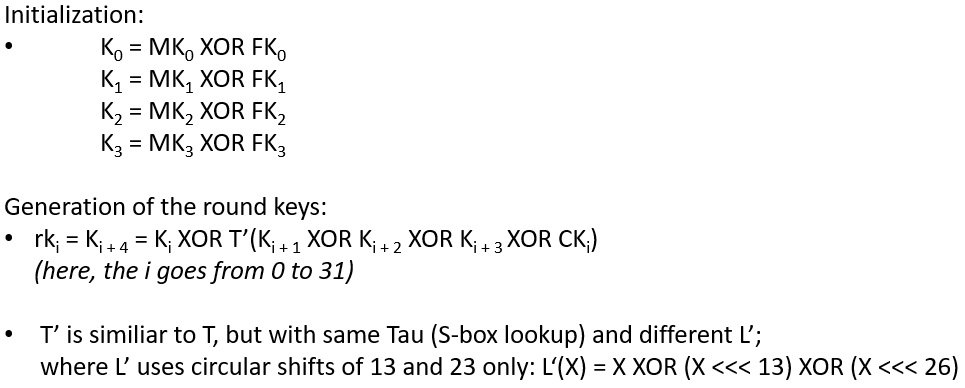
The key expansion process in the SM4 block cipher is a systematic procedure designed to generate a series of round keys from the initial master key MK. The primary objective of the key expansion is to produce 32 round keys that are both unpredictable and resistant to cryptanalytic attacks.

At the beginning of the key expansion, the algorithm takes the master key MK, which is 128 bits in length, and processes it through a combination of XOR operations, non-linear transformations, and cyclic shifts to generate 32 round keys. The master key is initially divided into four words, and these words are then combined with predefined constants known as FK to produce the initial key state.

Following the initialization, the key expansion employs a loop that iterates 32 times to generate the 32 round keys. Each iteration of the loop applies a transformation function, denoted as T’, on a combination of the current key state and another set of constants called CK . The transformation function T’ is similar to the round function T but is adapted for the key expansion process. It includes the same S-box transformation (Tau) for non-linearity and a modified linear transformation (L’) that uses different cyclic shifts:

Key expansion (equations)

A paper about the cipher

A good paper on the cipher, written (and translated? from Chinese) by Whitfield Diffie and George Ledin, offering a comprehensive explanation, is available at the following link: https://eprint.iacr.org/2008/329

This paper also includes some of the design choices and explains how the S-box was created.

A YouTube video about the cipher

Of course, I also made a YouTube video for my “Cryptography for everbody” YouTube channel :-). You can watch it here:

The Chinese Cipher ShāngMì 4 (SM4 ,商密4) Explained

From Ceylon to Amsterdam: The 10,000 km Journey of an Encrypted Dutch East India Company (VOC) Letter from 1674

In the annals of history, the Dutch East India Company (VOC) stands as a monumental force in global trade and colonial expansion. Even though they were the largest trading company of their time, the cryptography they used was almost non-existent.

Secretary Leewenson and a soldier in the desert (AI-generated)

Nevertheless, there is a testimony of at least one encrypted message that even traveled 10,000 km. I, together with the Dutch Historian Jörgen Dinnissen, decrypted the letter, which can be still found in the National Archives of the Netherlands in The Hague. This blog post looks at this captivating piece of this hidden history: an encrypted letter from the VOC era. It gives an insight into the secret communications of the VOC in the 17th century.

The Dutch East India Company (VOC)

Depiction of a Dutch Fleet (AI-generated)

The United East India Company, known in Dutch as Verenigde Oost Indische Compagnie (VOC), existed from March 20, 1602, to December 31, 1799. As the largest private company of its era, the VOC’s scale and influence were comparable to modern giants like Walmart, Amazon, or Apple. At its peak, the company boasted over 150 ships, 200-250 locations across Asia, and about 20,000 employees. It held a monopoly on Asian trade, particularly in spices like nutmeg, mace, and cloves. The VOC wielded immense power, capable of waging war, negotiating treaties, and establishing colonies. The “Lords Seventeen” (Heeren XVII) were the governing body of this monumental trading empire.

The seal of the VOC

Rijckloff Van Goens

Rijckloff Van Goens, born in 1619 and passing in 1682, was a pivotal figure in the Dutch East India Company (VOC). He notably served as the Governor of Ceylon (now Sri Lanka) twice between 1662 and 1672. Renowned for his diplomacy, Van Goens rose to prominence in Batavia (now Jakarta) by age 37.

Rijcklof Van Goens 1656 1657; Source: Wikipedia

In 1655, his strategic plans for Asia were approved by the “Lords Seventeen” (leading board of the VOC) in Amsterdam, leading to successful conquests in Northwestern India, Ceylon, and Southern India by 1658. His 1663 conquest of Cochin in India secured a vital region for pepper trade. By 1674, the VOC, under his leadership, controlled Ceylon’s coast while the inland was governed by the King of Kandy.

Dutch Ceylon and the Island Ramanacoil

Dutch Ceylon, established in present-day Sri Lanka by the VOC from 1640 until 1796, was a key governorate of the Dutch colonial empire. The Dutch captured most coastal areas but were unable to control the Kingdom of Kandy in the island’s interior. Initially, the Dutch were invited by the Sinhalese king to assist in fighting the Portuguese, which led to their capture of maritime provinces and establishment of control. Galle served as the capital of Dutch Ceylon initially, shifting to Colombo in 1658. Dutch rule in Ceylon concluded in 1796 following the British takeover, influenced by geopolitical shifts in Europe.

Ramanacoil, Island of Manaa, and Ceylon

The island of Ramanacoil, known today as Rameswaram, is situated off the mainland of South India. It is historically significant due to its connection with the Island of Manaar through Adam’s Bridge, a natural chain of limestone shoals. This geographical feature has been of interest for its historical and cultural connections, forming a link between India and Sri Lanka.

In 1674, during the Franco-Dutch War (1672-1678), Rijckloff Van Goens had ambitious expansion plans for the Dutch East India Company (VOC) in Asia. He made up a ‘wish list’ of territories he wanted to conquer. These ambitions took place against the backdrop of the war in which the Netherlands and the VOC were fighting against France, England and several other countries.

The Journey of an Encrypted Letter

In a time when communication was fraught with risks of interception and misinterpretation, an encrypted letter on this topic (conquering new land) from Rijckloff Van Goens embarked on a remarkable journey spanning approximately 10,000 kilometers. Dispatched from Ceylon, a crucial VOC stronghold of the time, the letter was carried by Van Goens private secretary Leeuwenson. Accompanied only by a single soldier for protection, Leeuwenson carried both the letter and additional memorized information for the Lord Seventeen. The journey took them 243 days. Van Goens, wary of the ongoing war against England and Spain, chose this over the sea route to ensure the message’s safety. To avoid detection, Leeuwenson and his companion disguised themselves in oriental clothing, blending in during their arduous and secretive journey (see first image of this blog article to get an idea how they may have looked like).

Leeuwenson presents the letter to the Lords Seventeen (AI-generated)

In the letter carried by Leeuwenson, Van Goens outlined significant military ambitions. He demanded the conquest of all Sri Lanka, Ramanacoil Island, and surrounding Indian coastal areas. To achieve this, he requested an additional 1,000 soldiers, planning to employ the successful tactics he used in 1655. Leeuwenson not only delivered this encrypted letter to the Lords Seventeen but also relayed additional memorized information. However, despite Van Goens’ efforts and strategic vision, the Lords Seventeen rejected his proposal. The VOC had shifted its expansionist strategy to a more cost-effective approach, focusing on reducing the number of locations and soldiers.

The Letter and Its Decipherment

Example of the “Ramanacoil Transcript”

Today, the intriguing letter sent by Van Goens is preserved in the National Archives in The Hague. This historical document, spanning 46 pages, is mostly encrypted using alchemical and astrological symbols. Fascinatingly, a copy of the key to this cipher is stored alongside the letter.

The original key of the “Ramanacoil Transcript” found besides the original letter

Students from the University of Uppsala transcribed the encrypted document, and my colleague Jörgen Dinnissen and I conducted a thorough cipher analysis, leading to publications in HistoCrypt [1] and the German computer magazine c’t [2]. We incorporated the key into CrypTool 2, facilitating an easy decryption of the letter, despite the transcription process being more time-consuming. The cipher, a monoalphabetic substitution cipher, omits the letters V and J and includes symbols for five double letters. Intriguingly, the words ‘CEYLON’ and ‘RAMANACOIL’ appear in the plaintext without corresponding nomenclature elements, hinting that Leeuwenson might not have crafted the key. Jörgen’s deeper analysis of the cipher elements offers further insights into this historical cryptographic puzzle.

Literature:

You may read the English research article as well as the German article in the c’t. Also, here is a link to the cipher in the DECODE database.

[1] Dinnissen, J. & Kopal, N. Island Ramanacoil a Bridge too Far. A Dutch Ciphertext from 1674. In Proceedings of the 2021 International Conference on Historical Cryptology (HistoCrypt 2021) (pp. 48 57). 2021.
url: https://ecp.ep.liu.se/index.php/histocrypt/article/view/156

[2] Kopal, N. & Dinnissen, J. Konzerngeheimnisse – Entschlüsselt: Ein Brief der Niederländischen Ostindien-Kompanie. c’t 16/2022 p. 13. 2022.
url: https://www.heise.de/hintergrund/Kryptografie-Brief-der-Niederlaendischen-Ostindien-Kompanie-entschluesselt-7189157.html

[3] Record 1564 in the DECODE database. “The Ramanacoil Transcript”.
url: https://de-crypt.org/decrypt-web/RecordsView/1564

A YouTube Video About the Ciphertext

Of course, I also made a YouTube video about the ciphertext and its story :-). You can watch it here:

How a 1674 Encrypted Letter Traveled 10,000 km

How We Solved Five Encrypted Letters of Maximilian II Written in 1574 and 1575

As a (historical) cryptology expert, a few years ago during my work for the DECRYPT project [4], I delved into a fascinating historical mystery that took me back to the year 1575. It was a pivotal year for the Habsburg Emperor, Maximilian II, who was vying for the crown, which was vacant at that time, of the Polish-Lithuanian Commonwealth, a vast parliamentary monarchy.

Portrait of Maximilian II. Emperor of the Holy Roman Empire (1527-1576), son of Ferdinand I.

While today’s election campaigns are awash with digital media strategies and online propaganda, back in the day, things were a tad different. Maximilian, being a foreign candidate, relied heavily on written correspondence to communicate his political promises and strategies to allies in Poland-Lithuania campaigning for his election. But there was a catch – these letters contained sensitive political information, and there was always a risk of them being intercepted by “the enemies”.

To my surprise, Emperor Maximilian II and his secretaries didn’t rely on the digit ciphers that were already popular at the time, e.g., in the Vatican. Instead, they encrypted their messages using a mix of alchemical symbols, astrological signs, Latin and Greek letters, numbers, and even some characters of their own invention.

What caught my attention was a discovery in Vienna’s state archives by two of my DECRYPT project colleagues (historian Prof. Benedek Láng and his PhD student of that time Anna Lehofer) – five encrypted letters related to Maximilian’s candidacy for the Polish-Lithuanian throne.

Using CrypTool 2, I was able to decipher the ciphertexts partially. Then, with the help of my good colleague and later co-author of two research articles [1,2] and an article for the German magazine c’t [2] about the topic, we we finally were able to decipher like 95% of the letters.

Deciphering Maximilian’s Letters – A Closer Look

Deciphering historical encrypted manuscripts is always a blend of art and science. When I first set my eyes on Maximilian’s letters, I realized that the challenge was not just in the encryption but also in the transcription. Also, I did not even know that the emperor Maximilian II was the author since there were no visible signs of sender and receiver marks on the letters. Only after Michelle suggested that Maximilian II may have been the author (she has a really good intution!) and we finally deciphered his name in one of the letters, we were sure about his authorship. The handwritten letters are filled with symbols that were not easily recognizable. There were alchemical and astrological symbols, Latin and Greek letters, and some characters that seemed entirely unique:

The start of the first letter of Maximilian II — Copyright Haus-, Hof- und Staatsarchiv Vienna

The initial step was to transcribe the symbols of the letters into a machine-readable format. To do this, we translated each symbol into a designated UTF-8 character. It sounds straightforward, but the challenge for us was in identifying and distinguishing between similar symbols.

A peculiar aspect of Maximilian’s ciphers was the use of spaces between words. This provided a significant clue. In most advanced ciphers, spaces (or the lack thereof) can serve as a method of obfuscation. But here, the spaces helped in identifying potential word structures, especially for shorter words.

Using my “Homophonic Substitution Analyzer” component of CrypTool 2, we began the decipherment process. The component uses a hill-climbing algorithm, which starts with a random assignment of ciphertext symbols to plaintext letters (a start key). It then continually refines this key by making small changes, improving the quality of the decipherment using a language model.

However, the tool isn’t just a “set-it-and-forget-it” solution. It requires active involvement. As we interacted with the software, we could manually adjust assignments, fixing correct letter identifications and choosing an appropriate language model based on the text’s suspected language. After several trials, it became evident to us that the letters were written in a German dialect of that era. Michelle, my colleague in this project, came to the conclusion that the letters were written by the sender(s) in a so-called “neutral” Austrian-Bavarian written dialect and in an office style typical of the Early New High German period. She also improved the decipherment significantly by correcting my initial work.

One particularly intriguing discovery in the letters was the use of “nulls” (which are usually meaningless filler characters; here denotated as hash symbols #) in the ciphers. These characters were likely used to confound potential eavesdroppers. But, upon close cryptanalysis and some educated guessing, phrases like “###MAX#IMILI#AN##” and “####DAT#PRAG DEN 5## IULII####1#5#7#5####” (Prague the 5th July 1575) were revealed, indicating the sender’s name, date, and location of dispatch.

The successful decipherment of the first letter paved us the way for the four others. In total Maximilian (or, more probably, one or even multiple of his secretaries) wrote three letters and two letters were written by Jan Chodkiewicz, a nobleman of that time. Some of the letters are encrypted using the same key, while others, though they were encrypted using a different key, were made easier for us to cryptanalyze due to the foundational understanding from the initial deciphering. Thus, this deciphering journey was a dance between manual analysis and algorithmic prowess.

Our Conclusion

In conclusion, our journey into the past showcased the encryption methods of the 16th century Holy Roman Empire. While Maximilian’s ciphers might have been challenging for contemporaries, they are no match for our modern computational power and algorithms. Nevertheless, compared to Vatican ciphers Maximilians ciphers are quite poorly designed and cryptanalysts of the time would have probably been able to also solve the ciphers. All in all it was a very interesting project to read letters that probably no one else was able to read for the last nearly 500 years.

Bibliography

If you want to read more details about the decipherment and the historical background, you may have a look at our two research papers [1] and [2]. If you are able to read and understand German, you may have a look at our c’t article [3].

[1] Kopal, Nils, and Michelle Waldispühl. “Deciphering three diplomatic letters sent by Maximilian II in 1575.” Cryptologia 46.2 (2022): 103-127. See https://www.tandfonline.com/doi/full/10.1080/01611194.2020.1858370
[2] Kopal, Nils, and Michelle Waldispühl. “Two Encrypted Diplomatic Letters Sent by Jan Chodkiewicz to Emperor Maximilian II in 1574-1575.” International Conference on Historical Cryptology. 2021. See https://ecp.ep.liu.se/index.php/histocrypt/article/view/160
[3] Kopal, Nils, und Michelle Waldispühl. Kryptische Propaganda – Entschlüsselt: Briefe von Kaiser Maximilian II. c’t 4/2022.
https://www.heise.de/select/ct/2022/4/2134408482322873782
[4] The DECRYPT project. https://www.de-crypt.org/


Introduction to the Affine Cipher and its Two Building Blocks (Additive and Multiplicative Ciphers)

Cipher clerk working on ciphers

A few weeks ago, I was asked by a viewer of my YouTube channel (“Cryptography for everybody”) if there was an “affine cipher component” in CrypTool 2. After taking a look at all our components, I realized that there was no component that implemented this cipher. I made a video for new CrypTool 2 developers and how they may implement the affine cipher, as an example of how to build new CrypTool 2 components. But I never added such an affine cipher component to CrypTool 2. So I sat down and created a brand new component and also made a YouTube video about the cipher (see the video at the end of this blog article). Also, in this blog article I summarize the video and how the encryption process works. You’ll also learn about the size of the key space and the unicity distance of the affine cipher. I hope you enjoy reading the article and that you understand how the cipher works afterwards.

1. Introduction to the Affine Cipher

The affine cipher is essentially a monoalphabetic substitution cipher, which means each letter of the plaintext is substituted with another letter to form the ciphertext. This method can trace its origins back to the time of the Caesar cipher, a cipher used in ancient Rome.

Over the course of history, as the mathematical domain grew, so did the complexity and strength of ciphers. The affine cipher is a one of the first testaments to this growth, combining the principles of two basic ciphers: the additive and the multiplicative cipher.

An interesting aspect of the affine cipher, and the ciphers we’ll be discussing, is that they operate on numbers. The ciphers essentially translate each letter of the used alphabet (e.g. the Latin alphabet) into a number (and back), providing a platform for mathematical operations. This translation is quite straightforward:

2. The Additive Cipher

Let’s start with the basics. The additive cipher functions by adding an offset number to each letter, shifting it to the right. This is the underlying principle behind the famous Caesar cipher.

For this cipher:

  • Key: The shift value, denoted as 𝒃
  • Encryption: 𝑐 = (𝑝 + 𝑏) 𝑚𝑜𝑑 26
  • Decryption: 𝑝 = (𝑐 - 𝑏) 𝑚𝑜𝑑 26

For example, consider a shift value (b) of 5:

Plaintext:  HELLO WORLD = 7 4 11 11 14 22 14 17 11 3
Ciphertext: MJQQT BTWQI = 12 9 16 16 19 1 19 22 16 8

3. The Multiplicative Cipher

The multiplicative cipher involves multiplying each letter with a specific number. This process essentially “randomly selects” a letter from the alphabet, but still for each plaintext letter always the same ciphertext letter.

Key elements:

  • Key: The multiplication value, denoted as 𝒂. However, there needs to be an inverse (𝑎⁻¹) of this value for decryption. For a number 𝒂 to have a multiplicative inverse modulo m (here the alphabet size, which is 26), 𝒂 and m must be coprime, which means their greatest common divisor (GCD) is 1. In mathematical terms: gcd⁡(a,m)=1.
  • Encryption: 𝑐 = (𝑝 ∙ 𝑎) 𝑚𝑜𝑑 26
  • Decryption: 𝑝 = (𝑐 ∙ 𝑎⁻¹) 𝑚𝑜𝑑 26

To illustrate, let’s use 𝑎 = 5 (with its inverse 𝑎⁻¹ = 21):

Plaintext: HELLO WORLD = 7 4 11 11 14 22 14 17 11 3
Ciphertext: JUDDS GSHDP = 9 20 3 3 18 6 18 7 3 15

Note: Computing the inverse of a number in modular arithmetic is crucial. Techniques like the extended Euclidean algorithm (see https://en.wikipedia.org/wiki/Extended_Euclidean_algorithm) come in handy, and we’ll delve into this in a future discussion (and youtube video :-))!

4. The Affine Cipher

Building on the previous concepts, the affine cipher is a combination of both additive and multiplicative ciphers.

Key components:

  • Key: Comprises a multiplication value 𝒂 and a shift value 𝒃.
  • Encryption: 𝑐 = (𝑝 ∙ 𝑎 + 𝑏) 𝑚𝑜𝑑 26
  • Decryption: 𝑝 = (𝑐 − 𝑏) ∙ 𝑎⁻¹ 𝑚𝑜𝑑 26

For a hands-on example, using 𝑎 = 5 (inverse 𝑎⁻¹ = 21) and 𝑏 = 5:

Plaintext: HELLO WORLD = 7 4 11 11 14 22 14 17 11 3
Ciphertext: OZIIX LXMIU = 14 25 8 8 23 11 23 12 8 20

5. Keyspace Size and Unicity Distance

Understanding key spaces and unicity distances is essential for appreciating the security of a cipher:

  • Keyspace size: For the affine cipher, we have 25 possible values for 𝒂 and 26 for 𝒃. However, 𝒂 and 26 need to be coprime. Thus, only specific values are valid for 𝑎 as they possess an inverse (𝑎⁻¹). These values are 1, 3, 5, 7, 9, 11, 15, 17, 19, 21, 23, and 25. The total key space is then 12 x 26 = 312.
  • Unicity distance (𝑈): This concept helps determine the number of characters required to uniquely identify plaintext from its ciphertext. For the affine cipher, using the entropy of the key space (𝐻(𝐾)) and the redundancy of the English language (𝐷), the unicity distance is approximately 3. The equation to compute the unicity distance is U = H(K)/D.

In essence, the affine cipher, with its mathematical underpinnings and historical significance, offers an exciting glimpse into the world of cryptography. Whether you’re a beginner or an aficionado, diving into these ciphers can be both intriguing and rewarding. Stay tuned for more cryptographic adventures also with CrypTool 2

6. A YouTube Video About the Affine Cipher

Of course, I also made a YouTube video about the affine cipher. You may watch it here:

The Affine Cipher – A Mathematical Substitution Cipher

Simplified AES (S-AES) Cipher Explained: Understanding Cryptographic Essentials

In the world of cryptography, security and simplicity are often at odds. But what if there was a way to bridge the gap between understanding cryptography and actually doing robust encryption? A few months ago, I found out that there is a simplified version of AES, called Simplified AES (S-AES). It is a very intriguing cipher intended as a teaching tool, analogous to Simplified DES (S-DES) for DES (which I had already implemented in CrypTool 2 many years ago). I implemented S-AES as a new CrypTool 2 component and also created a YouTube video about the cipher (see end of blog article). Also, my blog article here explains the main components of S-AES, breaks down the two rounds, and demonstrates the basic operations. I also suggest that if you really want to know how the cipher works, in addition to reading the article and watching my YouTube video, you implement the cipher yourself. As for me, I don’t understand a cipher 100% until I implement it myself :-).

We’ll start with an overview of the cipher. The following figure therefore shows the complete algorithm:

Overview of the complete simplified AES algorithm
Simplified AES Algorithm taken &
modified from [1]

S-AES is a block cipher and it has a keysize of 16 bit and a blocksize of 16 bit. It consists of two rounds and a key expansion, which generates two additional round keys based on the provided 16-bit key. The first round consists of four building blocks, while the last round only uses three of these. In the following, we first shortly discuss the history of the S-AES cipher and after that each of the building blocks. Finally, we have a look at the key scheduling.

1. The S-AES Cipher

Simplified AES, or S-AES, made its debut in 2003 thanks to the work of Musa et al. [2]. Just like its more complex counterpart, the Advanced Encryption Standard (AES), S-AES is a block cipher. However, it is designed primarily for educational purposes, making it a learning tool for the classroom. While AES operates on 128-bit blocks and employs 128, 192, or 256-bit keys, S-AES works with 16-bit blocks and 16-bit keys. Furthermore, S-AES comprises only two rounds, as opposed to AES, which has 10, 12, or 14 rounds depending on the key length [1]. This design allows cryptography enthusiasts to grasp the core concepts without the overwhelming complexity of AES.

[1] Holden Joshua, Rose Hulman Institute of Technology ” A Simplified AES Algorithm “. 2010 (Figures by Holden)
[2] Musa, Mohammad A., Edward F. Schaefer, and Stephen Wedig. “A Simplified AES Algorithm and its Linear and Differential Cryptanalyses“. Cryptologia 27.2 (2003): 148 177.

2. AddRoundKey Operation

The first step in an S-AES round is AddRoundKey. This operation involves XORing a 16-bit round key onto the 16-bit state. The state is shown here always as 4×4-table, each cell contains a nibble and the first column is the first byte and the second column is the second byte. XORing is a bitwise operation that combines the bits of two inputs, returning a new value based on their differences. Consider the following example:

AddRoundKey operation

In this case, each corresponding bit of the state and the round key is XORed together, producing the result 4E 52. Example XORing of a single state nibble:

Example XORing of a single state nibble

3. SubstituteNibbles Operation

Next up is SubstituteNibbles, which applies a 4-bit S-box to the 16-bit state. The S-box is a lookup table that replaces each 4-bit input with a corresponding 4-bit output. For instance:

SubstituteNibbles operation

The S-AES 4-bit S-box is a key element of this operation, performing a specific substitution for each possible 4-bit input value. An example S-box lookup for a specific value looks like:

Example S-box lookup for a specific value

The corresponding S-box table is defined as follows:

S-AES s-box table

4. ShiftRows Operation

ShiftRows involves exchanging the last two nibbles of the 16-bit state. It’s important to note that this operation is self-inverse, meaning it can be reversed to decrypt the data. For example:

ShiftRows operation

An example computation of ShiftRows looks like:

Example computation of ShiftRows

This is the only primitive, which is self inverse. All other primitives have an inverse which is used for decryption instead of the encryption primitive.

5. MixColumns Operation

MixColumns applies a matrix operation on the 16-bit state within the Galois field GF(16). This operation can be quite complex, but it’s essential for ensuring strong encryption. For example:

MixColumns operation

It uses the reducible polynomial 𝑥^4+𝑥+1 for GF(16).

The matrix to mix the columns is is:

MixColumns matrix

An example computation of both state bytes looks like:

Example computation of a single byte

The matrix multiplication is performed within GF(16). Best is to use a precomputed lookup table for the multiplication. To see how computing in finite fields works, have a look at https://en.wikipedia.org/wiki/Finite_field.

6. KeyExpansion

Inspired by the AES key expansion algorithm, S-AES’s ExpandKey operation computes round keys for each round. It employs a round constant array (Rcon) to generate the necessary keys. For instance, roundKey1 and roundKey2 can be computed using this scheme:

KeyExpansion scheme

And the g function is defined as follows:

KeyExpansion g function

7. YouTube Video

If you want some more explanations and details, please have a look at my YouTube video about S-AES, where I explain each step in more detail:

The Simplified Advanced Encryption Standard (S-AES) Explained

Unveiling the Secrets of the Lorenz SZ42 Cipher Machine: A Dive into German High-Level WWII Encryption

The annals of World War II are replete with tales of ingenious inventions, some designed to bring destruction, and others to guard secrets. Among the latter is the SZ42, or “Schlüsselzusatz 42,” a German rotor encryption machine. I was always fascinated of this machine, which is one of the first “stream ciphers” you could say. Since we had no implementation in CrypTool 2, I created an implementation based on the very good descriptions of the cipher written by my friend George Lasry. Also, I made a YouTube video about the machine which you can find at the end of this article.

Of course, I also wanted to write a blog article (this one here :-)), which shows all the components of the machine in detail. Therefore, in this article we’ll unravel the mysteries of the SZ42, exploring its history, inner workings, and the encryption it offered during wartime.

Lorenz SZ42 (“Schlüsselzusatz 42”)
Image from Wikipedia taken in Bletchley Park Museum

Introduction to the SZ42

The SZ42, short for “Schlüsselzusatz 42,” translates to “cipher attachment 42” in English. It was one of Germany’s cryptographic machines deployed during World War II. Notably, there were several models of this machine, including the SZ40 and SZ42, along with variants like SZ42a, SZ42b, and SZ42c. The Germans called it “Sägefisch” (“sawfish” in English), while at Bletchley Park, it went by the codename “Tunny,” akin to a tunafish.

Developed by the German company “C. Lorenz AG,” the SZ42 served the role of encrypting radio teletype (RTTY) communications. It began with an experimental link using SZ40 machines in June 1941, but it was the enhanced SZ42 machines that came into substantial use from mid-1942 onwards, primarily for high-level communications.

2. Baudot Code

To understand the SZ42’s significance, we must first delve into the Baudot code, the lingua franca of early teleprinter communications. Émile Baudot invented this pioneering bit-based code in the 1870s. It preceded the International Telegraph Alphabet No. 2 (CCITT-2), the most common teleprinter code before the advent of ASCII.

Baudot code words are composed of 5 bits, allowing for a total of 32 possible code words. However, this proved insufficient for encoding letters, digits, and special characters. To circumvent this limitation, Baudot introduced special symbols known as “figure shift” and “letter shift” to alter the code word representation. The version of Baudot code used in the SZ42 was the “Baudot-Murray-Code,” which optimized code assignments for commonly used letters, reducing strain on the teletypewriter mechanics.

Baudot Code Table – Regular and Bletchley Park (BP) Notation

3. How Does the SZ42 Encryption/Decryption Work?

The SZ42 operated by encrypting and decrypting Baudot code transmitted and received by teletype printers. It accomplished this by generating a “pseudo-random” stream called K, consisting of 5-bit code words, which was then XOR-ed with the plaintext (P) or ciphertext (C).

Encryption: C = P ⨁ K
Decryption: P = C ⨁ K

This method marks the SZ42 as one of the early stream ciphers, a critical precursor to modern encryption techniques.

4. The Inner Mechanism of the SZ42

The SZ42 boasted an intricate design with a total of 12 wheels, categorized into Chi, Psi, and Mu wheels. Each wheel had a unique pin count, with the Chi wheels having 41, 31, 29, 26, and 23 pins, Psi wheels with 43, 47, 51, 53, and 59 pins, and the Mu wheels with 61 and 37 pins.

SZ42 Logical Diagram

Whenever a pin was in an active position, it added a 1 to the keystream, while in inactive position it added a 0. For each of the 5 Baudot bits, there were one Chi, and one Psi wheel.
The Chi wheels stepped regularly after each encryption, whereas Psi wheels stepped irregularly if Mu2 had an active pin, with Mu1 also stepping regularly after each encryption. Mu2 only stepped when Mu1 had an active pin.

5. Key Generation and Motor Limitations

Key generation in the SZ42 was governed by specific rules for setting the allowed numbers of active pins on each wheel. For example, Chi wheel 1 had a rule like “Allowed number of crosses in Chi1 is 20 or 21.” These rules ensured the machine operated effectively.

Motor limitations, like “CHI2_1BACK,” were introduced to make cryptanalysis more challenging. They compelled Psi wheels to move at specific positions, increasing the complexity of decryption. These limitations aimed to reduce the number of motor stops for Psi wheels, enhancing the machine’s security.

For details have a look at: James Reeds, Whitfield Diffie, and J.V. Field. 2015. Breaking Teleprinter Ciphers at Bletchley Park: An Edition of I.J. Good, D. Michie and G. Timms: General Report on Tunny with Emphasis on Statistical methods (1945). John Wiley & Sons.

6. Keyspace Size and Unicity Distance

The SZ42’s keyspace size without any wheel setting rules was staggering:

Sub-keyspace Computations

Considering these immense sub-keyspaces for each wheel-set, the total keyspace size reached:

Total Keyspace Computation

This immense keyspace made brute-force attacks infeasible.

Furthermore, the SZ42 had a unicity distance U of 157, making it an incredibly secure encryption tool. Unicity distance can be camputed by dividing the Entropy of the keyspace by the redundancy of the (English) language:

Unicty Distance Computation

Unicity distance is a concept in cryptography that refers to the minimum amount of ciphertext (encrypted text) required for an attacker to uniquely determine the corresponding plaintext (original message) while performing a brute-force attack. Since there are no “half” letters, the unicity distance value is always rounded up. With the (non-key rules-restricted) SZ42 a minimum number of 157 letters is required to obtain only one single valid solution when performing an attack. With less letters, we obtain multiple plaintexts and we can not distinguish which one is the correct one.

7. Conclusion

The SZ42 cipher machine stands as a testament to the ingenuity of its time, showcasing advanced encryption techniques during World War II. Its large keyspace and wheel-based encryption made it a challenging adversary for codebreakers. This machine’s historical significance and cryptographic complexity serve as a testament to the ever-evolving world of encryption and information security. Nevertheless, using Colossus, one of the first “computers”, the code breakers of Bletchley Park were able to frequently break into the encryption offered by the SZ42. Today, using modern techniques like hillclimbing and simulated annealing, we are also able to break the cipher

8. A YouTube Video About the SZ42

I also made a YouTube video about the SZ42 which you can watch here:

The German SZ42 Cipher Machine Explained

The Grandpré Cipher Explained

Some days ago, I saw a very interesting hand cipher called the “Grandpré cipher”. It is not interesting because it was very secure or original. It is interesting because the “keying process”, i.e. the search for words for usage as the key(s), was kind of tedious. In this blog article, I will explain the background of the cipher, how it works, and its keyspace size and unicity distance.

History of the Grandpré Cipher

The cipher is said to be first published by A. de Grandpré in his 1905 French book “Cryptographie pratique”. It was later named after the author. Unfortunately, I did not find any information on the author despite his (or her?) last name. So, I actually don’t know what the “A.” stands for. The description of the cipher itself can be found in the book on page 31. The chapter is named “Méthode de carre de 10×10”, which can be translated to “10×10 square method”. Grandpré defined the method for squares of 10×10, but squares with smaller sizes (9, 8, 7, 6) can also be used. We did also implement the cipher in a CrypTool 2 component. So if you want to try it by yourself, you may download CrypTool 2 to do so. Here, we show the original cover of Grandpré’s book:

Image of the book "Cryptographie pratique" (1905) by A. de Grandpré

Cryptographie pratique (1905) by A. de Grandpré

The American Cryptogram Association (ACA) has added the Grandpré cipher to its portfolio of “standard ciphers”. Their description of the cipher can be found here: https://www.cryptogram.org/downloads/aca.info/ciphers/Grandpre.pdf

The Grandpr´é cipher is a homophonic substitution cipher based on a keyword and several additional words. The cipher encrypts plaintext letters into two-digit ciphertext numbers. It uses a table to do so. We will discuss how this works in the next section.

Table Creation Based on Keyword and Words

First, we need to find 10 words (or less), depending on our selected table size. The table size depends on our chosen secret keyword. Let’s say our secret keyword is “VIMOUTIERS” as used by Grandpré in his book. This keyword has 10 letters, so our table has to be a 10×10-sized table.

Now, we have to find 10 more words, each starting with a letter of our secret keyword. So a word for “V”, let’s take “VOLUPTUEUX”, a word for “I”, let’s take “INQUIETUDE”, and so on. Of course, here, for the example, we used the same words which Grandpré used in his book. To create the table, we write the keyword in the first column and the additional words in the rows. Each word starts with one of the letters of the keyword. The final table looks like the one below. But besides adding only the words, we also add digit coordinates (from 1 to “keyword length”; 10 = 0) to the rows and columns:

Grandpré 10x10 table

10×10-table based on the keyword “VIMOUTIERS” as shown by Grandpré in his book

Encryption and Decryption

Now, we can use this table to encrypt a text. To encrypt a letter, we need to find it in the table. Then, we use the row R and column C to create our ciphertext symbol “RC”. Examples: E = “34”, A = “47”, E = “66”. Here, you can also see why the cipher is a homophonic substitution cipher. We have several options to choose from for most of the letters. But you can also see the drawback of the cipher. It is troublesome to find words for the table creation that contain all letters of our alphabet. Especially rarely used letters like Q and X are difficult to add to the table.

As an example, here is the encryption of the plaintext “HELLO WORLD”:

As you can see, we have several valid ciphertexts. Since the Grandpré cipher is a homophonic substitution cipher, we can use different homophones to create a variety of valid ciphertexts.

Clearly, the decryption of a given ciphertext is the inverse process. Here, you always take two digits and lookup the corresponding plaintext letter in the same table as used for encryption.

Keyspace Size and Unicity Distance

Here, we calculate the size of the keyspace and the unicity distance of the Grandpré cipher. We compute the largest possible keyspace obtained by using a 10×10 table.

For the 10 x 10 case, there are 10 ∙ 10 = 100 cells in the table. Thus, we have a total number of 26^100 = 2^470 tables. But we use English words and don’t use the complete “table space”. Thus, let’s consider English has about 2,000 10-letter words. Then, we would “only” have 2000^10 valide tables, which is about 2^110 different tables.

Now, based on the above computed keyspace, lets compute the unicitiy distance U. It is the minimum number of letters needed when cryptanalyzing a ciphertext which allows us to be able to obtain only one valid solution. Below this number, we can find multiple valid English texts. To compute the distance, we have to divide the entropy of the keyspace H(K) by the redundancy D of the English language:

We need a minimum of 35 letters to be able to obtain only a single valid solution through cryptanalysis. Clearly, a given ciphertext can be solved like any other digit-based homophonic substitution cipher :-).

A YouTube Video About the Cipher

I also made a YouTube video about the Grandpré cipher. You can watch it here 🙂

The Grandpré Cipher Explained

The ElsieFour (LC4) Hand Cipher

ElsieFour (LC4)

Recently I stumbled across a very interesting cipher named ElsieFour (LC4), see specification in [1]. This cipher is a low tech cipher that can be computed by hand. It was developed by Alan Kaminsky and published in 2017. According to Kaminsky, it is designed hard to break. It is an amalgam of ideas from the RC4 stream cipher, the Playfair cipher, and the notion of plaintext dependent keystreams. It is a polyalphabetic substitution cipher. Besides encryption by hand, LC4 also allows authentication by hand. But this is not part of this blog article :-).

How does it work?

ElsieFour operates on a 36-letter plaintext alphabet A-Z, 0-9 (where 0 is # and 1 is _). The key is a permutation of this alphabet. LC4 uses a 6×6 grid filled with the keyed alphabet.

Encryption works as follows:
1. Choose a key (a particular permutation of the 36-character alphabet) and arrange it in a 6×6 grid
2. For each character in the plaintext message:
a) Determine the position of the character in the grid
b) Apply a sequence of movements in the grid (this includes moving the character, moving a “marker”, and possibly going around the edges of the grid) to determine the position of the ciphertext character
c) Write down the character at the new position as the next character in the ciphertext
d) Permute the grid in a specific way

Key Generation

Choose a key (a particular permutation of the 36-character alphabet) and arrange it in a 6×6 grid (e.g. “xv7ydq#opaj_39rzut8b45wcsgehmiknf26l”). And put the marker (red circle) into the top left corner. The tiles used for the grid are wooden plates which have the character and two small digits written on them:

Initial state of the grid generated using the key

Encryption

Here, we encrypt for example the plaintext “hello world”. For each character in the plaintext message:

1) We determine the position of the character (here the letter “h”) in the grid:

Marked position of the letter “h”

2) Then, we use the two small digits right and to the bottom of the marked letter. In this case the 3 and the 5. Go from the plaintext letter 3 to the right (wrapping around) and 5 to the bottom (wrapping around):

Determining the “movement” of the plaintext letter to obtain the ciphertext letter

3) After that, we write down the ciphertext letter (in this case the digit “8”).

4) Now, we permute the grid in the following way:

a) First, in the row with the plaintext character, we shift the tiles one position to the right, and put the rightmost tile at the beginning of the row:

Plaintext row shifted one position to the right

b) Secondly, in the column with the ciphertext character, we shift the tiles one position down, and put the bottommost tile at the beginning of the column. If the marker’s tile moves, the marker stays on that tile:

Ciphertext column shifted one position to the bottom.

c) Finally, we move the marker to the right the number of tiles shown at the right side of the ciphertext tile (here 2), wrapping around to the beginning of the row if necessary. We move the marker down the number of tiles shown at the bottom of the ciphertext tile (here 1), wrapping around to the beginning of the column if necessary.

Moving of the marker

The final state of the grid after encrypting the first letter should look like this:

Final state after encrypting the first letter “h” and moving the tiles according to the rules

If we encrypt the plaintext “hello world” using the above shown procedure with every plaintext letter, the final ciphertext is “8#4l_3lcf8s”.

The decryption is the inverse process. We implemented the ElsieFour cipher in CrypTool 2, thus, if you want to use it without the need of creating wooden tiles, you can download CrypTool 2 and use the ElsieFour component :-). Go to https://www.cryptool.org/en/ct2/downloads

Keyspace size and unicity distance

The keyspace size k is the number of all possible permutations of the 36 letter alphabet:

The unicity distance U is (entropy of keyspace H(k) divided by redundancy D of the language):

One final remark: If you make only one single mistake when encrypting or decrypting, the following plaintext or ciphertext is broken 🙁

A YouTube video about ElsieFour

I also made a YouTube video about the ElsieFour cipher :-). You can watch it here:

ElsieFour (LC4) – A Low-Tech Cipher Inspired by RC4

References

[1] Kaminsky, Alan. “ElsieFour: A Low-Tech Authenticated Encryption Algorithm For Human-To-Human Communication.” Cryptology ePrint Archive (2017). url: https://eprint.iacr.org/2017/339.pdf

The British “Typex” Cipher Machine Explained

The Typex is a cipher machine used by the British during World War II. It is, similar to the German Enigma cipher machine, an elector-mechanical rotor encryption machine. In contrast to the Enigma, the Typex was not broken during WWII. The Germans believed that Enigma is unbreakable and since Typex is very similar, they did not even attempt to break the machine.

I recently wrote a new CrypTool 2 component that implements the Typex cipher machine. If you are interested in testing the component (and the machine) yourself, you should download the latest nightly build of CrypTool 2.

History and Usage of the Typex

The Typex machine was used for
a) Encryption of the own communication
b) Deciphering German Enigma messages

It was developed by Wing Commander Oswyn G.W. Lywood, Flight Lieutenant Coulson, Mr. E. W. Smith, and Sergeant Albert Lemon.

This image here shows Oswyn George William Gifford Lywood; a photo by Walter Stoneman; bromide print, February 1945; NPG x186070 © National Portrait Gallery, London.

There were several different versions of Typex including: Typex Mark I up to Mark VIII, Mark 22 and Mark 23.

A very nice and more detailed overview of the history of Typex can be found here: https://typex.virtualcolossus.co.uk/typex.html

The Typex Components

In the following, we have a look at the machine’s components. The Typex machine consists of:

Components of Typex
Typex machine with marked components
Logical overview of Typex components

When pressing a key on the keyboard, the plaintext letter is printed by the plaintext printer. Also, current flows through the plugboard, the two stators, the three rotors and is then reflected by the reflector. Then it flows back through the three rotors and the two stators as well as the plugboard. Finally, the ciphertext letter is printed by the ciphertext printer.

Clearly, every time a key is pressed, between one and all three rotors move (Stators of course don’t move). In contrast to Enigma, a Typex rotor moves much more often. This is because the rotors have between 4 and 7 notches, while Enigma rotors had at most two notches.

The Typex Plugboard

The Typex plugboard is the first (and last) component (despite the printers), which current is lead through after a key is pressed on the keyboard. It allows to “plug” letters, creating an initial monoalphabetic substitution.

Typex plugboard

The plugboard is not reciprocal (like the Enigma‘s plugboard. With Enigma, if we have letter X to letter Y, then we would also have letter Y to letter X). It, thus, offers a larger keyspace than Enigma’s plugboard.

The Typex Rotors/Stators

Typex consists of two stators and three rotors. A rotor has more „notches“ than Enigma rotors (in CrypTool 2’s Typex implementation between 4 and 7). A rotor’s electrical contacts are doubled to improve reliability. Unfortunately, the original rotors are not published and still kept secret, thus, the simulators use no official rotor definitions.

Typex rotor

The Typex Reflector

The Typex reflector “reflects” the current coming from the rotors back through the rotors. In later Typex versions the reflector was replaced by an additional plugboard which allowed to change the reflector’s wiring easily.

Typex reflector

Keyspace Size and Unicity Distance

Since no original rotor definitions are known, the computation of keyspace size and unicity distance is based on the “CyberChef” Typex simulator written and published by GCHQ (see https://gchq.github.io/CyberChef/).

With this implementation, we have to choose 5 rotors (3 actual rotors and 2 stators) from a set of 8 rotors. Since a rotor can be put into the machine in forward or reversed position, they basically doubled the amount of usable rotors to 16. Here, we assume that we can use each rotor as many times as we like in parallel. Thus, the “rotor keyspace size” is:

Typex rotor keyspace size (“CyberChef” version)

We have to set the rotor start positions. We have five rotors (3 actual rotors and 2 stators). Each rotor can be in one of 26 different positions (A-Z). Thus, we have a total “start position keyspace” of:

Typex start position keyspace size

The plugboard is basically a simple monoalphabetic substitution cipher. That means, for the first letter we have 26 different letters to choose from, for the second letter, we have 25 different remaining letters to choose from,…
Thus, the “plugboard keyspace” is:

Typex plugboard keyspace size

To compute the overall keyspace size, we have to multiply all “sub-keyspace” sizes:

Total keyspace size of the Typex (“CyberChef” version)

To compute the unicity distance U, we have to divide the entropy of the keyspace by the redundancy of the (English) language:

Typex unicity distance U (“CyberChef” version)

This means, we need a minimum of 42 letters to be able to obtain a single valid solution when we perform cryptanalysis of a Typex message.

A YouTube Video about Typex and a Web-Based Simulator

I also created a YouTube video about the Typex cipher machine. Here, I discuss the machine as well as its keyspace size and unicity distance. Also, I show how to use the Typex component in CrypTool 2:

The British Typex Cipher Machine Explained

Finally, if you want to “play” with a really nice simulator (and also want to learn much more about the Typex), you should have a look at the “Virtual Typex”: https://typex.virtualcolossus.co.uk/Typex/

The usage of the simulator is also shown in the above linked YouTube video :-).

Screenshot of the “Virtual Typex”

The GRANIT / 160 Cipher – A GDR Stasi Hand Cipher for Spies

The GRANIT / 160 cipher is a hand cipher which was used for communication between the GDR’s “Ministerium für Staatssicherheit” (Engl. Ministry for State Security) or MfS or Stasi and their agents in West Germany. The Stasi’s “Geheime Dienstvorschrift” (Engl. secret service regulation) GVS 1064/59 and GVS 1065/59 describe its usage. Copies of the original (German) service regulations can be found on Jörg Drobicks’s homepage.

The logo of the “Ministerium für Staatssicherheit”(Engl. Ministry for State Security) or MfS aka Stasi – Source Wikipedia

The GRANIT cipher is a variant of the “Doppelwürfel” (= double columnar transposition cipher). The Stasi communicated with their agents in West Germany via numbers stations: The agent had to turn on a radio and wait for his call sign. Then, the agent notes down the spoken numbers and after that he decrypts the received message using the GRANIT cipher.

The West German “Zentralstelle für das Chiffrierwesen” (Engl. Central Office
for Ciphering) was able to capture and decipher messages, because they could guess some of the used keys.

The Günter Guillaume Case – An East German Spy Near Willy Brandt

Günter Guillaume and his wife Christel Guillaime were East German spies deployed in West Germany. Günter Guillaume became officer in the economic, financial and social policy department of German Chancellor Willy Brandt. The Guillaume couple used the GRANIT cipher for communication with the Stasi. But the West German “Zentralstelle für das Chiffrierwesen” was able to decipher some of their messages.

Willy Brandt and Günter Guillaume (right) in Düsseldorf. Image ~ 1973 – Source Wikipedia

Matching birthday date wishes and well wishes for the birth of a son were found in a deciphered message. The Guillaumes were finally caught and arrested in 1974. Ironically, mentioned birthday dates of the Guillaumes were their “agent fake birth dates”…

Despite having good evidence police raided his home but Guillaume instantly confessed being a Stasi spy when approached by police. More about the story can be read (in German) on Klaus Schmeh’s blog.

How the GRANIT / 160 Cipher Works

The GRANIT / 160 cipher is a hand cipher and consists of five steps:

  1. Create a straddling checkerboard based on a keyword
  2. Encrypt the plaintext using the straddling checkerboard
  3. Create two rectangles for a double columnar transposition based on two key phrases
  4. Encrypt the numbers (result of step 2) using the first rectangle
  5. Encrypt the numbers (result of step 4) using the second rectangle

Clearly, the Stasi defined how to create the keys, how to create message indicators so that the receiver of a message is able to decrypt, etc. The details of these procedures and the details of the actual cipher can be seen in the video below :-).

A YouTube Video about the Details of the Cipher

If you want to know, how the details of the GRANIT cipher work, please watch my YouTube video on “Cryptography for everybody” about the GRANIT cipher:

The GRANIT / 160 Cipher Explained – a GDR Spy Cipher